Showing posts with label brighten. Show all posts

Sunday, October 12, 2014

Fall trends worth trying

This fall is bringing in lots of new clothing and hair trends, both good and bad. There are some I like more than others, and some I would never wear myself. One thing is for sure, no one is afraid to experiment with various colors, lengths, and trends this fall.

Hats are an interesting piece to play with in an outfit, but its also an easy thing to get wrong. Adding a beanie to an outfit is almost always a plus. But you can't forget about all the other types of head wear. Fedoras, floppy knit hats, baseball caps, and headband are all things that add personality and a fun element to an otherwise boring outfit. I love the way the grey beanie looks paired with this dark colored flannel shirt. In the picture you can see how she layers this with a cream colored hoodie underneath. Add a pair of dark wash skinny jeans, some white Chuck Tailors and this makes the perfect outfit for autumn.

Embracing classic prints seems to be another huge trend this all. When you get tired of floral from spring, try hounds tooth for fall. This pattern has been huge on the runway lately. The great part is that it goes with almost anything. And I love this paired with bright colors like red and royal blue. You have to be careful however, too much of this pattern can be overpowering to the eyes. Try to keep the print small or limit it to a single piece instead of the entire outfit. This picture shows a great option for a more formal pairing with the black mixed with the pattern. Notice how she keeps the waist high.

One color I have always loved but never think to wear is emerald green. It looks great paired with other jewel toned colors like amethyst (a purple color). You see this a lot on the runway as well. This color is great for fall, as well as spring and summer. Light emerald is great for casual attire and darker emerald can be turned into a sultry formal outfit. This spring dress is simple but has a beautiful cut at the bottom, giving it the flare that makes it a perfect go-to for a day out. For fall, just throw on a cardigan, add a pair of fun sandals and a neutral tote of bag and you're good to go.


Word count: 402

Tuesday, September 30, 2014

5 Minute Cat Eye

Cat eye eyeliner is a fun way to spice up your daily makeup routine. You can easily play it up for a formal outing. You can make it sultry for a night out, or you can keep it simple for day to day wear. Whatever you choose, there are a few basic steps to creating the look you desire.

As far as materials go, all you really need for the basic cat eye is either a black gel liner with a small angled brush, or a black eye pencil. Using liquid liner will create a look that will smudge less, but is harder to blend or fix mistakes. You'll also want to have some Q-tips readily available to fix smudging and to blend out your liner.

To start off, apply your mascara like you normally would. Once this is dry, draw a rough line using your black eye liner pencil along your upper lash line. It doesn't have to be perfect because you will be going over it later. If you have trouble with this, try gently pulling up on your eyelid to expose the skin further.

Next, if you are using gel liner, load up your brush. In order to keep clean lines, try flipping your brush back and forth in the product to get an even coating.

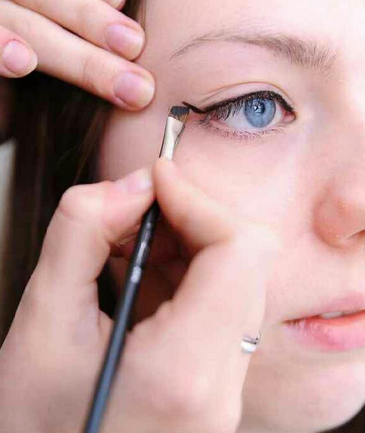
To find the angle you want for the "flick", follow your bottom lash line as if it would continue all the way to your brow bone and draw a line along that angle. Then go to the edge of the flick and pull it back along the lash line. You can see the way the makeup artist does this in the photo.


Use gentle strokes and remember to keep it small at first, you can always make it thicker and more intense after you get the general shape. Also try not to pull on your eyelid as you shape, it will distort the look of the cat eye when you move your finger. Just relax your eyes. If you make any mistakes just take a cotton bud and gently brush over the area.


When you are trying to get both eyes even, try placing a mirror on the table and look down as you fill them in to get a better angle.

When you have finished your cat eye, try blending some dark eye shadow in the crease of your eye to create depth and finish with a setting spray to help maintain the look all day.


Word count: 416

Monday, September 29, 2014

How To Look FLAWLESS in School Pictures

Most people have trouble when preparing for picture day. Here's a few steps you can take to make sure you are ready for your flawless photo shoot.

1. Clear skin = confidence

Going into a picture knowing your skin is looking its best can really take the edge off. If you don't normally, start washing and moisturizing your face 2-3 weeks before the picture is scheduled to prep it. This helps ensure you won't have any bad break outs, dryness, or uneven skin tones.

2. Put together an outfit. 

You can find something to wear that you already own, but buying something new is always fun. Make sure you select a shirt in a color that looks good on you. Also, choose something simple. No crazy colors or patterns. The pictures focus should be your face, not what you're wearing. You also want to stay away from anything that is too low cut, you don't need anything else to worry about when your getting your photo taken.

3. Style your hair.

Find something fun to do with your hair that you can practice the night before, You don't want to be scrambling in the morning, so make sure it's doable in a short period of time. You may want to choose something that brings your hair out of your face and eyes. 

4. Photo-ready makeup.

Especially when it comes to school photos, you don't want to over do it. You will end up regretting it later. Go for something simple, and remember the basics: apply lip balm first to make sure your lips are moisturized and ready. Avoid using moisturizers or primers that contain SPF, because this reflects the light of the camera and can cause your face to appear whiter than the rest of your body. Use a matte powder to set your makeup to control shine, and stick with a neutral eye shadow palette. Make sure to fill in your brows with either an eye pencil or matte shadow. Last but not least, make sure to add a little more blush to your cheeks than normal. Flash photography can remove up to 20% of color and intensity from your makeup, and you want to avoid looking washed out, so blush away.


Word count: 373

A Guide to Good Brows

Full brows have been the trend the past few seasons, but now that we've grown them out, we still need to keep them tidy. Color and shape both play a large roll in getting that perfect eyebrow look you are striving for.

A good start is always to get your eyebrows professionally shaped by someone who can give you advice on what works for your face shape, skin tone, and hair color.

Tweeze, wax, or thread? Whatever your preferred method is to care for your brows, they each have their own upsides and downfalls.

Tweezing is a great option for girls into DIY beauty because it can be done easily and completely at home with just a pair of tweezers, this is also the most cost effective method. You can use a brow pencil to get a general shape, then tweeze around that. The downfalls include some semi-perminant results. It is important to be conservative when shaping your brows because, unlike a bad haircut, the hair wont always grow back. Stay away from magnifying mirrors. They get too close and you tend to over do the plucking.

Threading creates a more natural finish because you work closer with the hairs. Its also faster than tweezing each hair individually, an easy way to amp up your shape. But while this technique can offer an undone effect similar to tweezing, it can cause for some reckless hair removal and also requires a visit to a beauty salon, which can be more pricey in the long run.

Waxing out of all three methods tends to be the most permanent, It leaves sharp, clean lines, which, depending on your preference, could be a good or bad thing. This method is great for a girl who is always busy and doesn't have time to care for her brows day to day. Or if you tend to have thicker and coarser hair because it encourages thinner, softer regrowth. The obvious con of waxing is the red patches it leaves behind for a short period of time after treatment. This may or may not be a problem for you depending on how soon afterwards you are looking to go out and show off. This also tends to only be a problem for people who have more sensitive skin types.

Whatever method you choose, it always helps to fill in with a little color and a brow comb to give them an added boost!


Word count: 406

How to: Fake Wide-Awake Eyes

School has begun to drag on over the past month, but just because its Monday, doesn't mean you have to start your week off with tired looking eyes. There are ways to fake the wide awake and fully rested face...

The Tear Duct Trick:
It all starts in the tear duct, pick a light pink shade of eye shadow. Avoid chalky, silver colored highlighters, they tend to look more blue, making your eyes, especially the tear ducts area, appear drawn and tired; the opposite of what we want. Also try to avoid heavier products. Some liquids work, but most liquids and creams can be thicker on the skin and you do not want that in your eye area. Pink is a color that flatters all skin tones, as well as balancing out yellow and pink undertones.

White Water Line:
Another easy way to make your eyes appear more awake and ready for the day is to line your bottom water line, the piece of skin between the eye and your lower lash line, with a white eye pencil. This brightens the eyes and makes them look bigger. Using a waterproof eye pencil for this will be essential if you want it to stay all day.

Eliminate puffiness:
Puffy eyes are a dead give away of sleep deprivation. Using something chilled— a bag of ice, frozen peas— should do the trick as long as you hold it on the area for 10-15 minutes. 

Exfoliation:

Not only does this brighten your skin to make you look more awake, but it has many other benefits for your skin to stay healthy. Its best to use a treatment that contains dead skin dissolving fruit acids.

Curling Eyelashes:

When your eyes aren't cooperating, curling your eyelashes is a must! It makes mascara application simpler and easier. For the biggest impact, apply the curler once before mascara application, and once after they have completely dried.

Eye Shadow Trick:
You might think a shimmery light shade will brighten up your eyelids, but the truth is, when your tired it can exaggerate puffiness. A warm brown shadow is perfect for visually deflating bloated lids. Try to stay away from anything with pink or red undertones.

Blush to Cancel Under-eye Circles:

Using a little bit of peachy pink blush on the apples of your cheeks or on the cheekbones can detract from your tired eyes' under eye circles that tend to have blue or purple undertones. This also adds warmth to your complexion. 


Word count: 414

Sunday, September 21, 2014

Kitchen Cupboard Beauty Heros

  You don't always have to go to the department store and spend a boatload of money on expensive brand-named products. Especially when a lot of what makes store-bought products so expensive is the fancy packaging and labels. You might be surprised how many all natural beauty ingredients you already have sitting in your kitchen, or just a quick trip to the grocery store away. In addition to being cheep, anything you make at home will be 100% natural, making it a great option for people with sensitive skin. Not to mention that DIY is all the rage this year. Here's a few you might want to try:


1) Shea Butter
This has a ton of benefits for your skin, along side the fact that it smells amazing. Its nourishing texture makes it great for anti-aging treatment. It has SPF 5 for natural sun protection, which means it can be used as a daily sunscreen. Organic Shea butter also has anti-bacterial properties. This helps prevent stretch marks, and heal wounds. 

2) Easy Exfoliates
Exfoliates are great for the skin and so easy to make with about anything you can find in your kitchen. Mild exfoliating once or twice a week, in addition to daily cleansing, can dramatically improve the results of your skin care routine by removing dry and dull skin cells from the surface of your face which keeps your pores from becoming clogged.
One of the easiest recipes I know combines sugar, olive oil, and warm water. 

3) Simple Blackhead Remedy 
Blackheads can appear all over the face and can be extremely frustrating. Luckily there are a few easy kitchen tricks to help illuminate them! 

  • One uses a mix of 1/2 teaspoon of Cinnamon and a tablespoon of honey. Using your fingers, dab onto dry skin.
  • Another option is a egg white mask. Taking two eggs, separate the whites from the yokes and apply to face. Let it sit for 10-15 minutes. This will help tighten pores, giving you smooth and clear skin.


4) Strawberries for white teeth?
Mashing up a strawberry and adding a little bit of baking soda is a quick and easy way to get whiter teeth! Use your toothbrush to scrub on for about 5 minutes and you're good to go.


Word count: 381

Tuesday, September 9, 2014

5 Must-Have Beauty Products for Summer

This Summer was hot, and so are these must haves to keep your skin, face, and hair ready for the sun and the sand of the pool and the beach!


1) The first must-have for your Summer hair product check-list is the Pronto Braid Paste

The best way to keep hair out of your face when the temperatures really heat up is with a braid or top knot, and this product will make sure your 'do stays all day long. It has a great long-lasting, non sticky formula, which makes it perfect for all hair types. You can pick this up at Ulta or order it off of oscarblandi.com for just $25.


2) NYX Dewy Finish Setting Spray = Great "Summer looking" skin!
While this product doesn't do the best job of making my makeup last all day it does do a great job of giving my face the nice dewy Summer finish we all love. Also, NYX as a brand itself is generally very affordable so that is one perk of this product over something on the high-end scale. This setting spray goes for about $8.


3) 
Garnier BB Cream... foundation and moisturizer in one?!

BB Creams are big this year, especially for the Summer face because not only do you get coverage for blemishes but you are also protecting your skin from the harmful rays of the sun (yay)! *Also, this product works great for dry skin without getting too oily! This BB Cream by Garnier comes with SPF 20 built into the smooth formula and comes in a variety of shades to fit any skin color. Price ranges around $13-- which can be a little pricy for such a small bottle.


4) Bad pool hair? Sexy Hair Soy Renewal Beach Spray.

Take advantage of your beachy waves while you're in the sun with a few sprays of this hair renewal spray! The large bottle is great for home, but pick up a travel size to carry with you on vacations as your must-have quick fix to a bad hair day.


5) Absolute must for running late; Dry shampoo by Herbal Essences

Don't have time to shower? Not a problem, at least for your hair. Herbal Essences Dry Shampoo smells great and helps to soak up oils in your hair that tend to make it look greasy and unappealing. Great, inexpensive product to throw in your beach bag and carry with you on-the-go! 


Word count: 405