Sunday, October 12, 2014

Are you ruining your hair?

Our hair is a mysterious thing and some days it even seems to have a mind of its own. But even on the days when you and your hair aren't on the best terms, its important to take care of it and prevent it from future damage. Sometimes you accidentally do things that may be causing damage, without even knowing it.

If you don't use protection when you turn on the hot helpers (flat iron, curling iron, etc.) then you are only hurting yourself. Its ridiculously easy to apply a heat protectant spray, spraying it on just like hair spray and letting it dry, to help with split ends and permanent damage. It creates a protective barrier between the hair cuticle and the heat of your beauty tools.

Another way you may be accidentally hurting your follicles is by OD-ing on moisture. This is fairly common because it is usually stressed to moisturize as much as possible, but that's not necessarily the case. Silicons are the ingredients in many smoothing, moisturizing products that leave your hair looking especially shiny, but they can build up over time and lead to dull, stringy strands. One solution? Using a silicone-free conditioner, like Living Proof’s Leave-In Conditioner ($24)

Next, your hair is made up of protein, so make sure you’re eating enough of it. Think: fish, chicken, lentils, and other beans. Other foods that contain an amino acid will also help your hair stay healthy—reach for pork, broccoli, and red peppers.

The next tip comes right after your shower and is something most people are surprised by. 
Drying your hair with a towel isn’t cutting it. A plain cotton tee is a much better option. The texture of an ordinary bath towel actually roughs up your cuticle and leaves it frizzy, while a t-shirt can combat that. Just squeeze excess moisture out gently, pull your hair through the neck of the t-shirt, and wrap it in a turban style.

Lastly, a simple one. And it's aggressive brushing. This one is terrible because it happens most likely every day after you shower, which is when your hair is the most venerable. Its soft because of the conditioner from the shower and its wet, a deadly combination. A tactic that I've been using for years that makes brushing easier on me and my hair is bringing a hairbrush into the shower and combing through my hair, gently, while I have conditioner in. This removes the tangles without stressing out the hair as much.

Word count: 418

The right blush for your skintone

We've all seen it. Someone who overdid it just a tad on the blush that morning and ended up looking more like a clown than a girl. It happens to the best of us, but its an easy fix.
Sometimes how blush looks on the skin has less to do with the amount you apply and more to do with finding the shade that is going to compliment your skin tone and give you the radiant look you desire without looking ridiculous. One thing is for sure, putting blush on is one of the best way to instantly radiate your skin and give a glow that makes you look more cheerful and happy.
Your gut instinct may be to go with the color you like the best or the one you think looks like the one "everyone else wears," but just like we all wear a different clothing size, we all have different skin tones and different color compliment them differently. Whether you prefer cream blush or powder, finding the right color is the most important, second to application. Keeping it light is the best way to make sure you won't have a blush catastrophe. You can always add more, but its almost impossible to remove what you've already done without having to completely start over with your makeup. And when it comes to getting ready for school, time is of the essence.

For fair skin, its important not to go too dark. You don't want to overpower your beautiful porcelain skin. Stick with a light peachy pink and a light application for more of a glow than a "blush".


For medium skin tones, just like fair skin, peaches and pinks are your best go-to, however you may want to take it a step further and go a shade or two darker. A rich pink or even mauve will provide
you with a lasting glow, without being too much.


For darker skin tones, deep shades of red, orange, and brown look best. Pink colors will tend to leave you looking more washed out than flushed.


Keep the blush focused on the apples of your cheeks for daytime wear and bring it up the cheekbones for a nighttime look. If you want something more dramatic you can always use contour shades with darker bronzier colors and a lighter highlight shade on the top of your cheekbones. However when it comes to contouring, especially during the day, like grandma always said, less is more.


Word count: 412


Fall trends worth trying

This fall is bringing in lots of new clothing and hair trends, both good and bad. There are some I like more than others, and some I would never wear myself. One thing is for sure, no one is afraid to experiment with various colors, lengths, and trends this fall.

Hats are an interesting piece to play with in an outfit, but its also an easy thing to get wrong. Adding a beanie to an outfit is almost always a plus. But you can't forget about all the other types of head wear. Fedoras, floppy knit hats, baseball caps, and headband are all things that add personality and a fun element to an otherwise boring outfit. I love the way the grey beanie looks paired with this dark colored flannel shirt. In the picture you can see how she layers this with a cream colored hoodie underneath. Add a pair of dark wash skinny jeans, some white Chuck Tailors and this makes the perfect outfit for autumn.

Embracing classic prints seems to be another huge trend this all. When you get tired of floral from spring, try hounds tooth for fall. This pattern has been huge on the runway lately. The great part is that it goes with almost anything. And I love this paired with bright colors like red and royal blue. You have to be careful however, too much of this pattern can be overpowering to the eyes. Try to keep the print small or limit it to a single piece instead of the entire outfit. This picture shows a great option for a more formal pairing with the black mixed with the pattern. Notice how she keeps the waist high.

One color I have always loved but never think to wear is emerald green. It looks great paired with other jewel toned colors like amethyst (a purple color). You see this a lot on the runway as well. This color is great for fall, as well as spring and summer. Light emerald is great for casual attire and darker emerald can be turned into a sultry formal outfit. This spring dress is simple but has a beautiful cut at the bottom, giving it the flare that makes it a perfect go-to for a day out. For fall, just throw on a cardigan, add a pair of fun sandals and a neutral tote of bag and you're good to go.


Word count: 402

Saturday, October 4, 2014

How long is long enough? Knowing when to put down the beauty tools

Oh the thin line you toe, how long is "too long"? The striaghtener, the hairdryer, not to mention all of the products you added before, the ones you'll add after. How much is too much?
This is interesting because most of us don't even think about it. When we get up in the morning, we just just do what we've always done. But you do have to be careful, you don't want to cause long term damage to your hair or skin, just by going about your everyday routine..


Eyelash Curler: 3 seconds per section
We’ve all had the unfortunate experience of over-curling our eyelashes to the point where the curl is more of a kink–not cute. The trick to avoiding crimped lashes is to hold the curler in place for no longer than 3 seconds. If you use our 3-step method to curl your eyelashes, you can press down for up to three seconds at each point.

Facial Cleansing Brush: 1 Minute
Personally, I have become my own victim on this one. Electric cleansing brushes are a lot more powerful than manual cleansing with your hands. It can be tempting to over do it because you are going for the baby soft to the touch texture, but it can cause long term damage if done too frequently. Your skin can become dry and more susceptible to damage because you are ridding it of its natural oils it uses to protect itself.

Curling Iron: 3-7 seconds depending on hair type
Its easy to burn hair with these hot tools, especially if they are part of your everyday routine. Try taking a day of two off once a week. Your hair will be shinier, healthier, and have less split ends.

Straightener: a few seconds per section
The same thing applies with straightening, don't ever do it, you'll just end up with more hair damage. Is it really worth having nice hair for a day if it'll cause permanent split ends? Try adding a heat protectant daily to reduce damage.

As tempting as it can be to tack on a few extra seconds here and there, you really aren't benefiting from it. In fact your only hurting yourself. Burnt hair and dried out skin aren't worth it. You'll still receive the same benefits without the extra time, trust me.


Word count 390

8 money savers every girl should know

You may be tempted to blow your budget on unnecessary products you think you need, or throw away an item you think is used up. Don't.
There are a ton of inexpensive alternatives to name brand pricey high end products, and many tricks you can use to get the most of out the ones you already have.


1. One of my favorite dupes for makeup brush cleanser is Johnson's Baby Shampoo, you can buy this almost anywhere, it works just as well, and it costs almost nothing. A large bottle will last you months.

2. Get the last of any liquid makeup out of a tube using hot water and a small container, like a contact case.

3. The hot water trick also works for getting the clumps out of dried mascara. You can also add a few drops of saline to old mascara to make it good as new. 
Reuse old brushes from more expensive brands in new bottles of cheaper mascara. Just rinse your brush in hot water to get rid of 
clumps and you’re ready to go.


4. Makeup remover wipes are great. Problem is…those makeup remover cloths are EXPEN$IVE! Especially the big brand name ones. So for quite awhile now I’ve been buying the cheapest, store brand ones. But ANOTHER problem is…the cheap ones are CHEAP for a reason. They aren’t as soft and/or moist as their more expensive rivals.
You can make your own:
Just take some paper towels, 4 cups of warm water, 1-2 tablespoons Coconut Oil. (1-2 squirts of baby wash or your favorite face wash if you want, but it’s not necessary)


5. If your perfume is running low, pour the last drops into a bottle of (unscented!) lotion to make it last longer.


6. Cut open bottles to get all the product you might be missing otherwise. ***This is a huge one***
You never know how much is left that you cant see.

7. Fix broken eye shadows and pressed powders with a little rubbing alcohol. Or, turn broken eye shadow into a custom nail color by mixing the pigment with clear polish.


8. Beauty tools are a huge expense and add up quickly. Cut your makeup sponges and cotton rounds in half to get more uses out of them, you'll quickly realise how much you've been wasting that you don't even use.


Word count: 399

Friday, October 3, 2014

Can wearing bright colors improve your mood?

Do you ever have those days where getting out of bed seems like the most impossible task on the planet earth? We all do. And when it comes to dressing myself on these days, it always seems easier to throw on a pair of dark jeans and a grey sweater. Something simple, something.. boring.
I mean the last thing I want to do is attempt a trendy outfit when I can hardly stand to shower in the morning.
Liana Satenstein, a writer for vogue magazine, posted an article on this yesterday where she tells of her wardrobe "transformation" from a boring black and grey color scheme to mixing wide array of colors and textures to add personality to her outfits.
The article deserves a read, if you are interested I have it linked here.

Her experiences are not only motivational for other girls to start expressing themselves through their clothing, but raise an interesting question... Does changing your day to day wardrobe really have an effect on your mood?
I found this to be an entertaining research project,
here is what I came up with:

While it isn't directly proven that clothing we wear can effect the outcome of our emotions, what we do know is that there has been a long history of the use of color for therapy in ancient civilizations, this is known as chromotherapy. Red being used to stimulate the body and increase blood circulation, orange to increase energy levels, and so forth.
However, that being said, most modern psychologists are skeptical of the idea, especially of its lasting effects over long periods of time. But even if it is all "just in your head", does it really matter?
Even if you are skeptical of the idea, its worth a try.
As far as my personal experience goes, the difference is minimal, but not to be dismissed as irrelevant. I would say however, that my mood reflects not only in the colors of the pieces I'm wearing, but more in the cut, shape, and style of the pieces themselves. If I feel confident in a particular outfit, I don't think it would make a difference what color it is.
If you do tend to lean towards the side of a neutral color palette, its not hard to work bright pieces in with accessories. Your clothing choices should represent who you are, and you should be proud to wake up in the morning, open up your closet, and flaunt whatever it is you may choose to wear that day.

Word count: 422

Tuesday, September 30, 2014

5 Minute Cat Eye

Cat eye eyeliner is a fun way to spice up your daily makeup routine. You can easily play it up for a formal outing. You can make it sultry for a night out, or you can keep it simple for day to day wear. Whatever you choose, there are a few basic steps to creating the look you desire.

As far as materials go, all you really need for the basic cat eye is either a black gel liner with a small angled brush, or a black eye pencil. Using liquid liner will create a look that will smudge less, but is harder to blend or fix mistakes. You'll also want to have some Q-tips readily available to fix smudging and to blend out your liner.

To start off, apply your mascara like you normally would. Once this is dry, draw a rough line using your black eye liner pencil along your upper lash line. It doesn't have to be perfect because you will be going over it later. If you have trouble with this, try gently pulling up on your eyelid to expose the skin further.

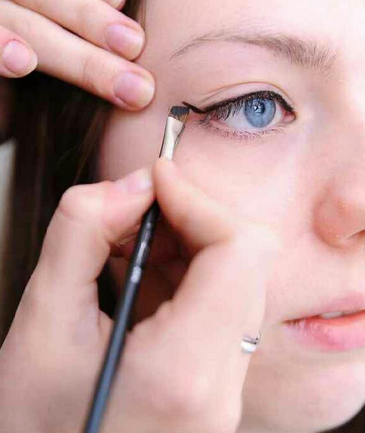
Next, if you are using gel liner, load up your brush. In order to keep clean lines, try flipping your brush back and forth in the product to get an even coating.

To find the angle you want for the "flick", follow your bottom lash line as if it would continue all the way to your brow bone and draw a line along that angle. Then go to the edge of the flick and pull it back along the lash line. You can see the way the makeup artist does this in the photo.


Use gentle strokes and remember to keep it small at first, you can always make it thicker and more intense after you get the general shape. Also try not to pull on your eyelid as you shape, it will distort the look of the cat eye when you move your finger. Just relax your eyes. If you make any mistakes just take a cotton bud and gently brush over the area.


When you are trying to get both eyes even, try placing a mirror on the table and look down as you fill them in to get a better angle.

When you have finished your cat eye, try blending some dark eye shadow in the crease of your eye to create depth and finish with a setting spray to help maintain the look all day.


Word count: 416